
BonVision
Getting Started
- Install BonVision from the package manager, make sure to select Community Packages for the package source dropdown.
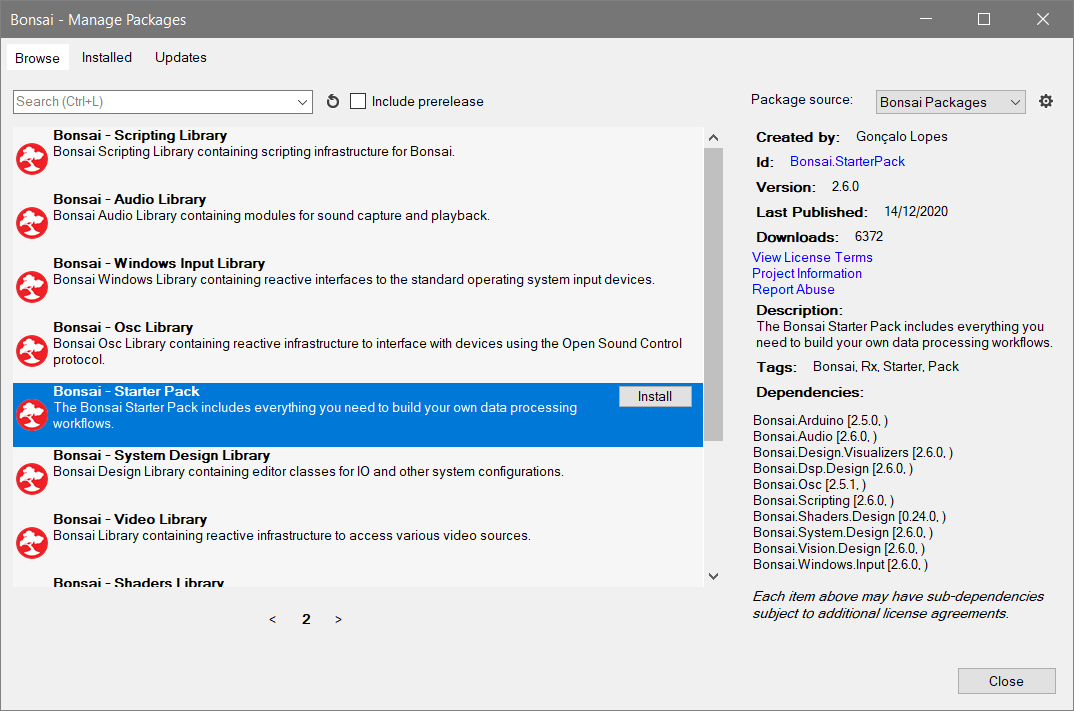
- This should also install the Bonsai.Shaders package as a dependency, check it is installed in the installed tab.
Exercise 1: Rendering a 3D model

- Create a the display initialisation branch:
CreateWindow–>BonVisionResources–>MeshResources–>LoadResources. - Download a 3D model from the course repository e.g.
icosphere.obj. - Double-click
MeshResourcesand add the downloaded model as aTexturedModel, give it a name like icosphere. - In a new branch create a
RenderFramesource and insert aPerspectiveViewfrom BonVision. Publish the output as aPublishSubjectcalledDrawCall. - In a new branch, subscribe to
DrawCalland insert aDrawModelfrom BonVision. In draw model select the imported 3D model in theMeshNameproperty. - When you the run the workflow you should see the rendered 3D object.
- In the workflow so far, what does the output of
PerspectiveViewrepresent? In which shader and to what property is this output applied? (HINT: Use right-click » Go to definition… on the BonVision nodes to explore). - Try changing the color of the rendered object using the albedo property.
- Try adjusting the scale, rotation and position of the rendered object.
- Try adjusting the properties of
PerspectiveView- how do they affect the rendering of the object? - Try adding other models to the rendered scene.
Exercise 2: Animating scene objects

- Externalize the
RotationYproperty ofDrawModel(right-click). - Create a
RangeAnimationoperator. Set its duration to 3s, and have it move between 0-359 (RangeBegin:RangeEnd). - Add a
Repeatto cycle this animation infinitely. - Insert a
DegreeToRadianfrom theNumericspackage and hook the output to theRotationYproperty. - The object should now spin on the y-axis.
- Try and implement other animations. E.g. can you make the object bob up and down? (HINT: Use the
Sinoperator from theNumericspackage).
Exercise 3: Benchmarking screen round-trip latency
In a previous worksheet (closed-loop) we measure the closed-loop latency of our Arduino serial port with a digital-feedback test. Here we will adapt this method to estimate the closed-loop latency of our display system.

- Insert a
CreateWindow,BonVisionResources,LoadResourcesin a branch. - In a new branch create a
BehaviorSubjectto store a color value (call it something likeCurColor), initialised withCreateVector4with all properties as 1 to start with a white color.

- In a separate branch add a
RenderFrame. - We only need a 2D environment for this benchmark so we’ll insert a
NormalizedView. - Every render call, we want to draw a 2D plane with the most recent set color. Use a
WithLatestFromthat has a subscription toCurColoras the 2nd input. - Can you explain why we use a
BehaviorSubjectin this context? - Output the color item from
WithLatestFromand use it to update color property of theColorshader withUpdateUniform. - Finally, insert
DrawMeshwith thePlanemesh andColorshader.

To close the loop, we want to use a photodetector (in this case the analog grayscale sensor) to switch the current color to a contrasting color whenever it detects a change: e.g. detect white –> change to black –> detect black –> change to white …
- Shown above is a partially completed part of the workflow to achieve this.
AnalogInputis used to sample an analog port with a grayscale sensor connected.LessThanandDistinctUntilChangedare used to produce boolean events whenever the light level crosses a particular threshold.- Complete this part of the workflow to produce a feedback switching behavior (HINT: refer back to Ex. 1 of the closed loop worksheet).
-
Once this is working, how can you extend/modify this workflow to estimate the closed-loop latency?
- Optional: Can you create a workflow that measures and estimates input latency? Input latency is the time from a user-input (e.g. key press, button push) until a change appears on screen in response (e.g. color change).
Exercise 4: Closed-loop VR
In this exercise, we will build a 3D scene that reacts to a tracked ‘real-world’ object. By moving the scene view relative to this object we’ll turn the monitor into a simple augmented reality window. To begin we’ll set up the object tracking.
![]()
- For this task, we want to be able to track an object in 3 dimensions:
- X: Horizontal movement (i.e. left to right)
- Y: Vertical movement (i.e. up and down)
- Z: Forward movement (i.e. closed and further from the camera / screen)
- A convenient way to track the Z-axis is to have a tracked object with two same-colored markers at a fixed distance from each other. During tracking we can use the pixel-distance between these two markers as a proxy for distance.
- In the camera view, as the object approaches the camera, the two markers will have a greater pixel distance between them.
- Set up a color tracking workflow that includes
BinaryRegionAnalysisto track the object markers. - Insert a
Conditionthat filters the stream to include only events when both markers are present. - Branch from the
Conditionand create 3PythonTransformoperators to calculate:- Z-axis (distance from camera)
- X-axis (lateral position relative to camera)
- Y-axis (vertical position relative to camera)
- Use
Rescaleto remap the outputs of these calculations. We want to convert pixel space to ‘physical’ distance in the 3D environment.- For example in the X-axis, if the camera image is 640 pixels wide, we would want to map 0:640 pixels to e.g. -2:2.
- Use
CombineLatestto pack the rescaled outputs together. - Use
ExpressionTransformto convert theTupleoutput to a dynamic class with named properties:
new (
  it.Item1 as Distance,
  it.Item2 as Lateral,
  it.Item3 as Vertical
)
- Use a
PublishSubjectcalledTrackingto publish this class.

- Set up the 3D visual environment.
- For
MeshResourcesyou can download 3D models from the course repository. - Double-click on
MeshResourcesand add some downloaded models (Add » TexturedModel). - In a separate branch create a
RenderFramefollowed by aPerspectiveView. Create aPublishSubjectto publish thePerspectiveViewdata (ViewMatrix, PerspectiveMatrix). - In a separate branch (or multiple separate branches) use the
DrawModeloperator to populate the 3D scene. Use theMeshNameproperty to select a model fromMeshResources. - Experiment with the properties of each
DrawModeloperator to modify the position and appearance of objects in the scene. - Experiment with using externalized properties of the
DrawModeloperators to dynamically modify these properties.

- Subscribe to the
Trackingsubject and use it to populate aCreateVector3.- Use an
InputMappingto populate the vector, try and determine which tracked axes correspond to X, Y, Z of this translation vector.
- Use an
- Externalize the
Eyeproperty ofPerspectiveViewwhich defines ‘camera’ position in the scene and connect theCreateVector3. - Run the workflow and observe the results in the display window.
Challenge (optional): Endless runner
- Create an ‘endless runner’ style game in Bonsai.
Example specs:
- Player constantly moves forward through space, can adjust lateral movement via camera object tracking.
- Obstacles spawn at random at some distance from the player and get closer as player moves forward, these objects must be avoided (or navigated towards e.g. score pickups).
- How can you detect ‘collisions’? Determining whether the player has interacted with or avoided an object.
- Player accumulates score over time (can you display this score on the display window?).
- If the player collides with an obstacle, the game resets.